At Home Phoropter
Motivation and Goals
Getting a decently accurate eye prescription often requires equipment called a phoropter that costs from $1000 to over $10,000. Moreover, phoropters can use hundreds to thousands of unique lens combinations to test a person’s vision, making them large and complicated to use. So, a person who cannot easily visit an eye doctor or afford such expensive equipment may have trouble with testing their eyesight.
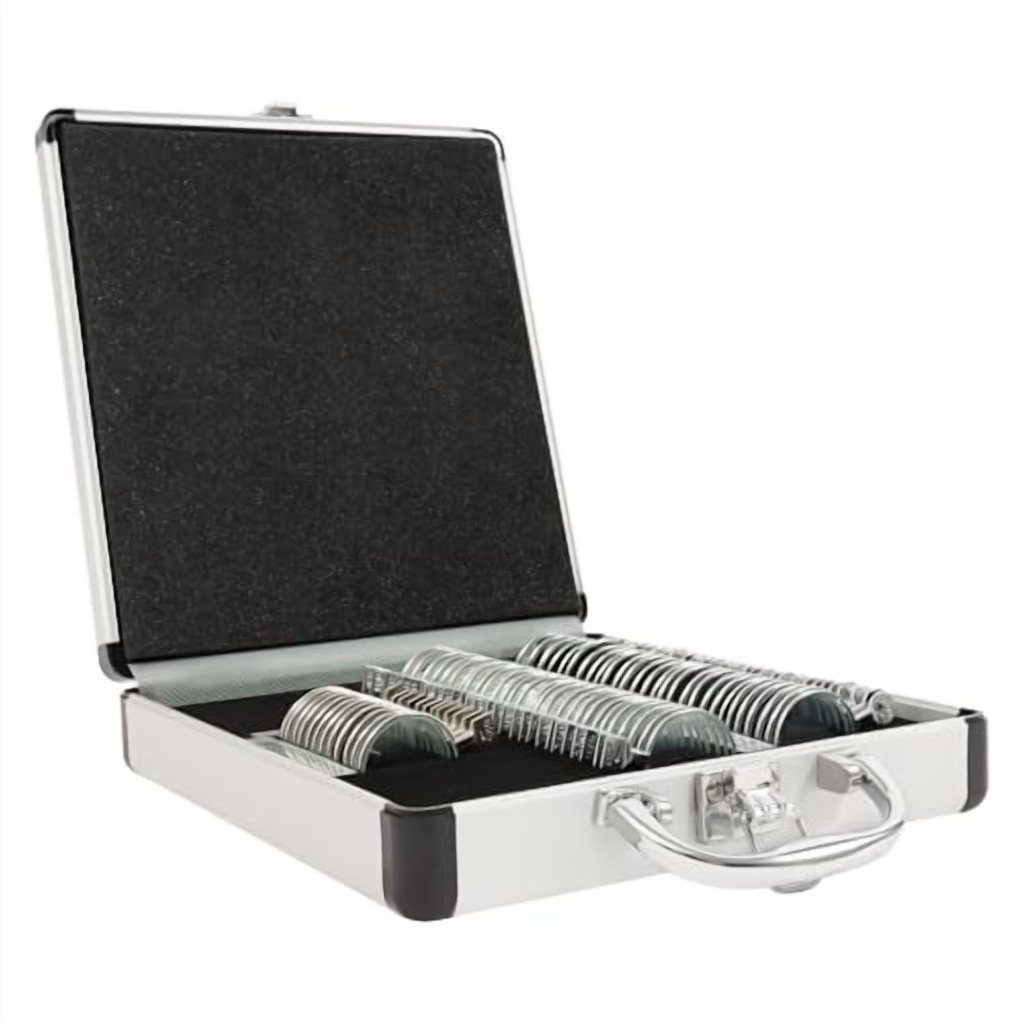
Our project aims to create an affordable, easy-to-use, and compact at-home phoropter that can determine someone’s prescription up to ±0.5. We will be doing this by using an online-available 68-piece lens kit that goes up to a ±14 strength prescription.
Background
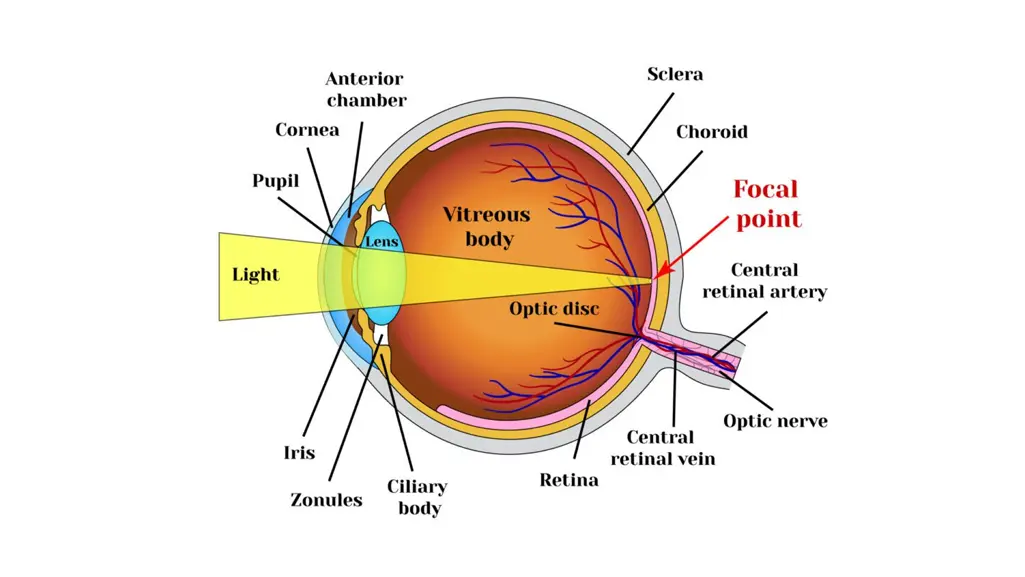
A phoropter is an instrument used to determine a patient’s refractive error, which is an eye condition where the shape of the eye prevents light from focusing directly on the retina. The point at which the eye focuses is called the retina. In the image below, notice how the focal point lies directly on the retina of the eye; however, for people with ametropia (a refractive error in the eye), this focal point will lie either in front of or behind the retina. If it focuses in front, it will cause nearsightedness (myopia), while if it focuses behind, it will cause farsightedness (hyperopia).
Concave and convex lenses can correct vision by refracting light in such a way that readjusts the focal point to lie on the retina. Concave lenses diverge incoming light before it enters the eye, shifting the focal point farther back onto the retina for a nearsighted eye. In contrast, convex lenses converge incoming light before it enters the eye, moving the focal point forward onto the retina for a farsighted eye.
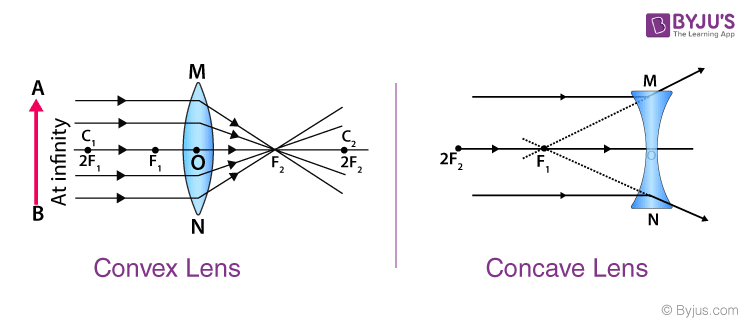
So, myopia can be corrected by finding the appropriate diopter strength (measure of how strong the lenses are) that will readjust the focal points of each eye. The focal points are found with this equation
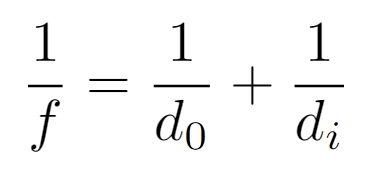
where f is the focal point, d0 is the object distance (how far the thing you are looking at is from the glasses), and di is the image distance (the distance from the lens to the virtual image it creates). The virtual image is what the glasses’s wearer effectively sees. The lenses refract incoming light from the object so that the light appears to come from a different location (at a distance where the eye can focus it clearly onto the retina). For nearsightedness, the image distance is set at the person’s far point, which the furthest distance they can see clearly without help. And likewise, for farsightedness, the image distance is set to the person’s near point.
Now, the optical power of lenses is measured in diopters, which is defined as
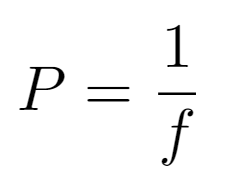
where f is measured in meters. Positive diopter values correspond to convex lenses, which are used to correct farsightedness, and negative diopter values correspond to concave lenses, which are used to correct nearsightedness.
In our at-home phoropter design, we will be using lenses in combination to approximate diopter strength values for lenses we don’t have. For two lenses separated by some small distance d, the effective focal power is

where P1 and P2 are the powers of the individual lenses. When the lens spacing is very small compared to the focal lengths involved, the correction term dP1P2 becomes negligible, allowing us to approximate
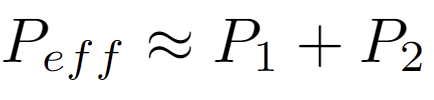
This allows us to use multiple inexpensive lenses to test many prescriptions. For example, in our test kit, the maximum magnitude of a lens’s diopter power is 14, so we can approximate higher values by taking lenses in combination. So, if the patient has a needed prescription of -15.5D, we can take

Note that as we begin estimating larger optical power prescriptions, the correction term begins to become significant. For example, in the previous case, if the lenses were separated by one centimeter, our correction term would be -0.21D, which is somewhat significant. However, these are more severe vision conditions and as such relatively rare (you should go to an eye doctor if you do have these).
This project also considers astigmatism, which is a condition caused by an uneven curvature of the cornea or lens. This means that instead of being a uniform sphere that focuses light at a singular point, it is unevenly curved in some way such that it is steeper in one direction than the other (think of a football, where when starting from the center, one directions curves more sharply that the other). This curved shape means that there will be two focal points instead of one and additionally, will cause orientation-dependent blurring since the eye has different focusing powers along different directions.
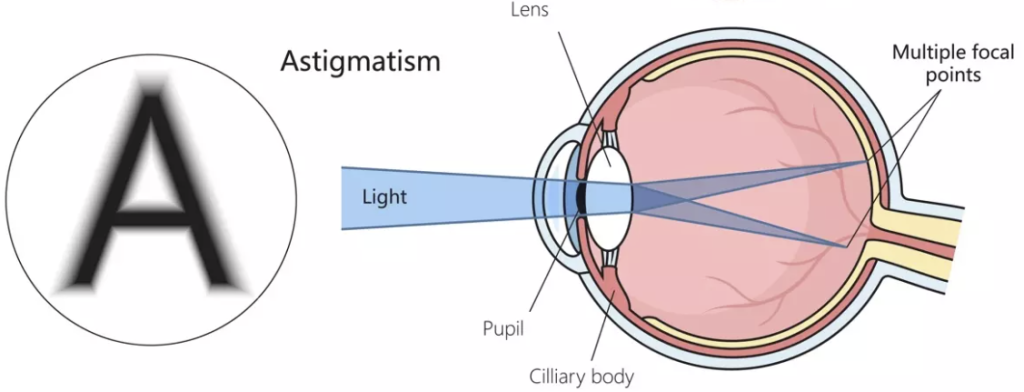
Astigmatism is corrected using cylindrical lenses, which provide optical power along only one axis. The orientation of this correction is specified by some axis angle. In our testing, we can approximate the correct lens orientation by rotating a cylindrical lens until the person sees most clearest.
A full testing procedure is in a below section.
Our Design
We designed a glasses-esque device that will hold the lenses in combination and are easily accessible to be swapped out during testing.
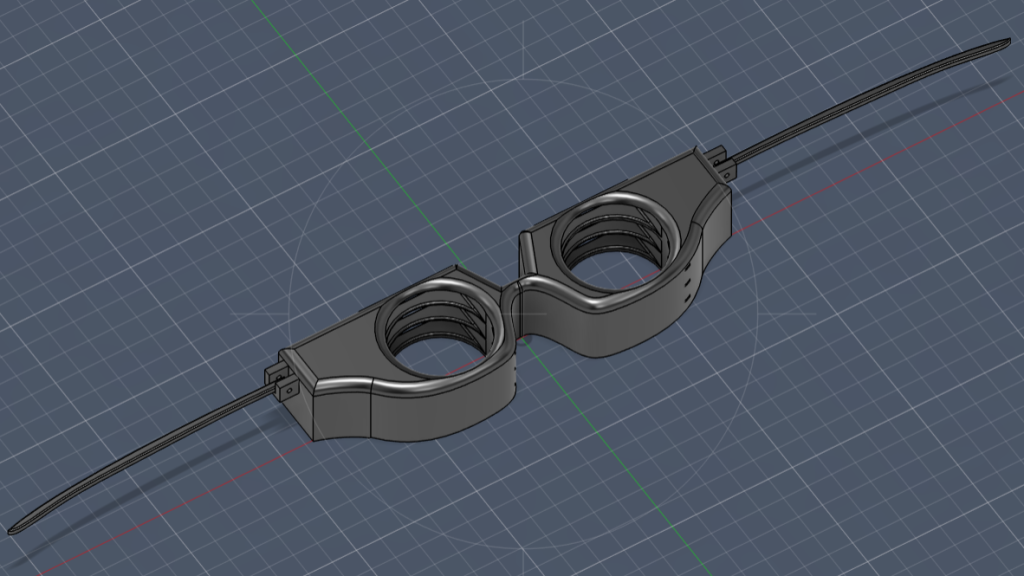
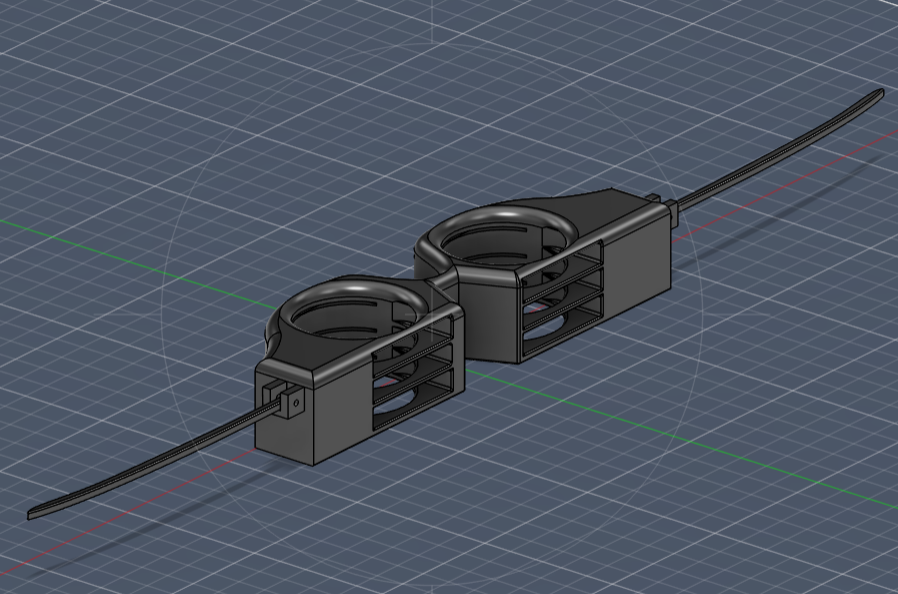
We designed it such that you can place up to three lenses in combination at one time. Note that the lenses we used vary in width based on the diopter strength, so the width of the slots are designed to fit the thickest lenses. However, this means for the lower diopter lenses, they will be too narrow for the slots, making them wiggle and jostle around with any movement. So, we added clay to bottom of the glasses to hold them in place.
For future experimentation, we planned to change the slots to account for this wiggling. Specifically, the lenses have a metal ring around their circumference. This metal ring is uniform in width for all of the lenses, so we could construct the slots such that the outside edges form a rail system which “grabs” the outside metal ring and allows the lens slide down securely.
The lenses we used can be found here.
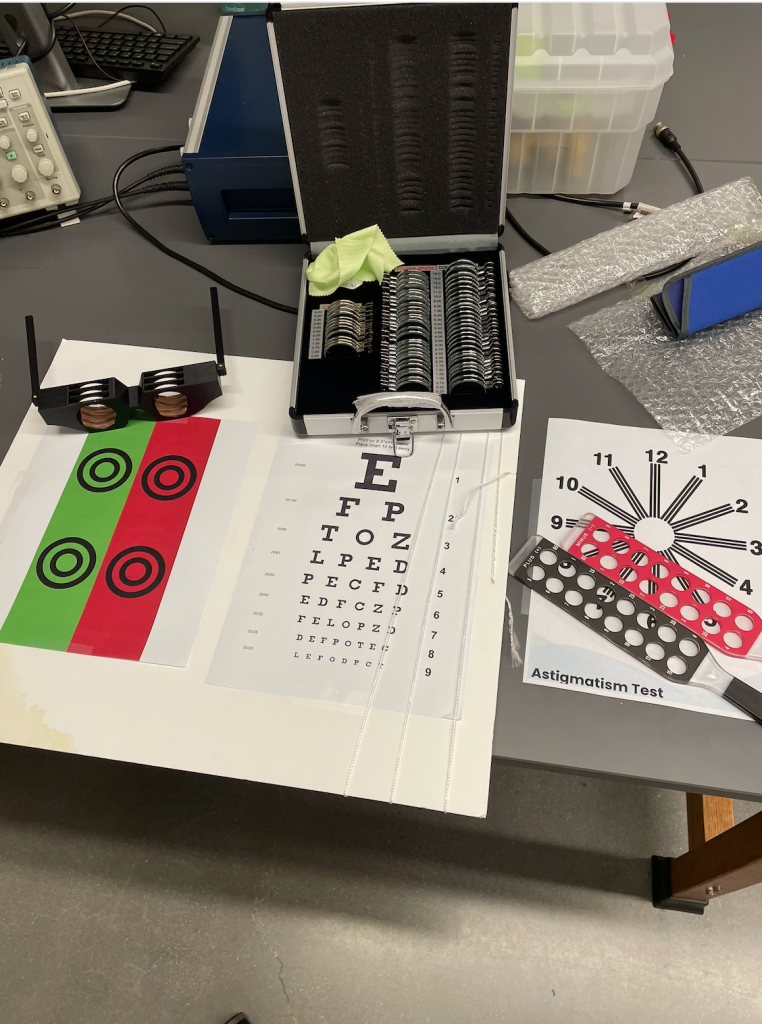
We also had a lens rack, which was used to quickly estimate the general range of prescription needed before doing the more detailed tests.
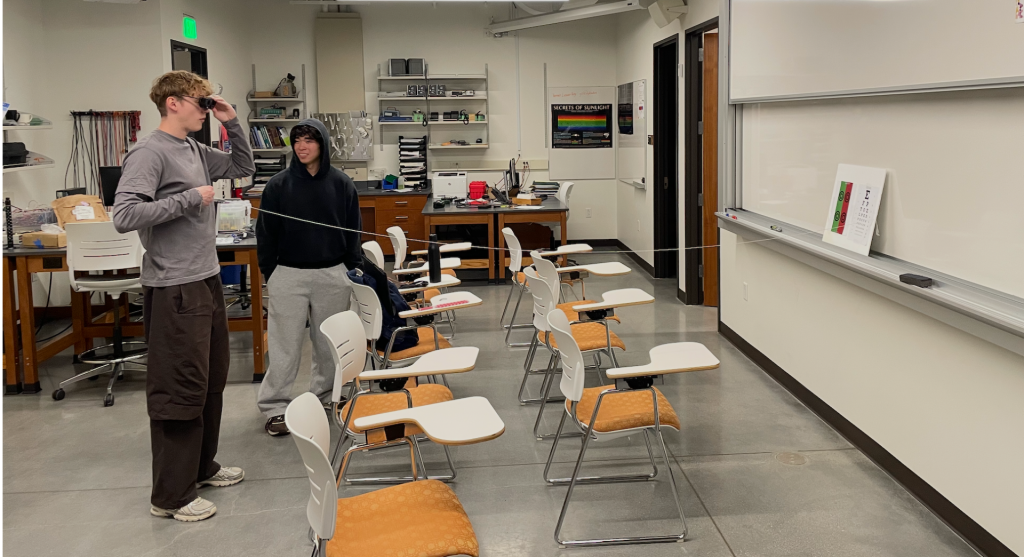
To test people’s vision, we printed out online-available eye charts for both astigmatism and myopia. We taped these on a posterboard and attached a 10 foot string to it so that a person can grab onto it and walk back the needed 10 feet. Our full materials is shown below.
Testing
Test Procedure
Below is the testing procedure we used.
Initial Vision Check
- Have the person stand approximately 10 feet away from the eye chart or target using the attached string
- Ask “Can you clearly see with your bare eyes?”
- Test each eye separately:
- Cover one eye while testing the other.
- Repeat for the opposite eye.
Determine General Vision Type
- Use the lens rack to estimate the person’s prescription range.
- Go through the rack lenses one by one until vision improves.
- Observe responses:
- If the person cannot see distant objects well without lenses, they are likely nearsighted.
- If they struggle more with close vision or require positive lenses, they may be farsighted.
- Negative (-) lenses → nearsighted correction
- Positive (+) lenses → farsighted correction
Refining the Prescription
- Begin with the closest prescription slot to the estimated range from the rack.
- Start with the smallest lens strength within that range.
- Ask after each adjustment:
- “Can you clearly read the letters?”
- Continue adjusting based on feedback.
- Signs the lens is too strong:
- The person’s eye appears to be “adjusting” or straining to focus.
- Give the final prescription.
Astigmatism Procedure
- Ask the person:
- “Do you have astigmatism in either eye?”
- If yes, test each eye separately. If not, can continue too.
Astigmatism Lens Adjustment
- Based on their given prescription in the last section, increase their prescription by -0.05 to make it extra negative.
- Give a cylindrical lens to the person’s free hand.
- Ask the person to slowly rotate the cylindrical lens until the image appears clearest.
- Estimate and record the angle of rotation (axis).
- Test different strengths of cylindrical lenses if the image is still not perfectly clear.
Discussion of Results
Overall, we found that we were able to determine people’s prescription within approximately ±0.5 diopters. However, we were unable to test many participants, since a majority of the class and surrounding students either had perfect vision (making testing trivial) or wore contacts (making it difficult/inconvenient to perform the tests), so our dataset was limited in size. For future experimentation, increasing the number of participants (with an emphasis on a wider range of prescriptions) would improve reliability and further test our at-home diopter’s accuracy.